Customize Your Shopify Store with Wishlist Button and Script
Table of Contents
- Introduction
- Front-End Customization of the Website
- The Default Theme and its Limitations
- Adding a Wishlist Button to the Product Page
- Challenges with Different Themes
- Instructions for Code Placement in Different Themes
- The Importance of Clear Documentation
- Creating Documentation for Your App using Vue.js
- Storing JavaScript Files in Your App
- Including External CSS and JavaScript in Your Theme
- Automatically Adding JavaScript Code with Script Tags
Introduction
In this article, we will be discussing how to customize the front end of a website. We will focus on a specific aspect, which is adding a wishlist button to the product page. This customization requires some knowledge of Liquid, the templating language used by Shopify. We will cover the steps involved in adding the button and provide instructions for different themes. Additionally, we will explore the importance of clear documentation and demonstrate how to create documentation for your app using Vue.js. Finally, we will discuss the inclusion of JavaScript and CSS files in your theme, and the option to automatically add JavaScript code using script tags.
Front-End Customization of the Website
When it comes to customizing the front end of a website, there are various aspects to consider. One of the key elements is the visual appearance of the store, including the layout, colors, and overall design. Additionally, functionality plays a crucial role in enhancing the user experience. In this article, we will focus on a specific customization - adding a wishlist button to the product page.
The Default Theme and its Limitations
By default, when you install a Shopify app, it usually comes with a default theme provided by Shopify. This default theme is commonly used by many stores, resulting in a lack of uniqueness. One limitation of the default theme is its inability to properly display images on the collection pages. As a result, the images may appear distorted or not properly aligned. While this issue is not your fault as a developer, it is important to be aware of it when customizing the front end of your store.
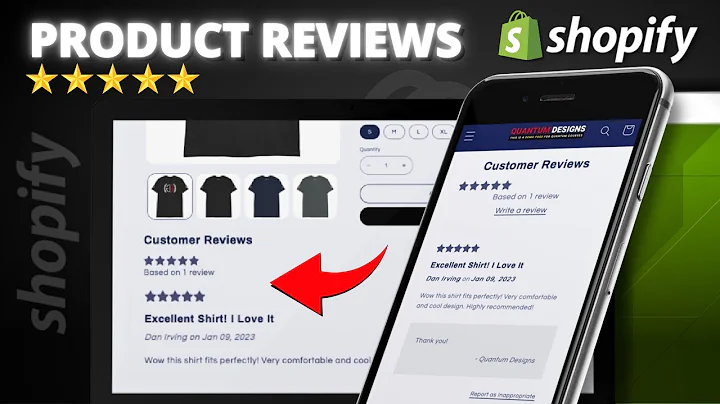
Adding a Wishlist Button to the Product Page
To address the limitation of the default theme and add a wishlist button to the product page, we need to manually modify the theme. This involves adding a button to the product template file using Liquid. The specific steps may vary depending on the structure of the theme you are working with. In some cases, you may need to add the button to the product form, while in others, it may be added to the product template.
To add the wishlist button, you can modify the Liquid code and include a new button element. This button should have a unique class name and an appropriate label, such as "Wishlist". By refreshing the front end of your store, you should be able to see the newly added button.
Challenges with Different Themes
One challenge when customizing the front end of a website is dealing with different themes. Each theme has its own structure and file hierarchy, making it difficult to provide a universal set of instructions for code placement. This means that the same code snippet may need to be added to different files or sections depending on the theme being used. As a developer, you may need to work with multiple themes, each requiring its own specific customization steps.
Instructions for Code Placement in Different Themes
To overcome the challenge of working with different themes, it is important to provide clear instructions in your app's documentation. When configuring your app, make sure to include detailed instructions on where and how to add the necessary code. This will help store owners and developers easily customize their themes without confusion or frustration. Providing a clean and concise set of instructions will save time and ensure a smoother installation and configuration process.
The Importance of Clear Documentation
Clear documentation is essential for any app or software. It provides users with a step-by-step guide on how to install, configure, and use the product effectively. In the case of Shopify apps, clear documentation is crucial for developers and store owners to understand how to integrate the app into their store's theme. It helps them navigate through the customization process and ensures a seamless experience.
Creating Documentation for Your App using Vue.js
Vue.js is a popular JavaScript framework that allows you to create user interfaces efficiently. It can be used to generate documentation for your Shopify app, providing a clean and organized structure for your instructions. With Vue.js, you can create templates, components, and sections for each step of the installation and configuration process. This makes it easier for users to follow along and ensures a smoother integration of your app into their store.
Storing JavaScript Files in Your App
When working with JavaScript files for your app, it is important to store them in a convenient location. By default, Shopify provides a public directory where you can store your app's JavaScript files. This directory can be accessed directly from the front end of your store, allowing you to include the file using a script tag. Storing your JavaScript files in the public directory ensures easy access and smooth integration into your theme.
Including External CSS and JavaScript in Your Theme
In addition to customizing the front end of your store with your app's JavaScript files, you may also want to include external CSS and JavaScript files in your theme. This may be necessary to add extra functionality or styles to your store. To include these files, you can use the import statement in your theme's code. By specifying the file name and location, you can easily import external CSS and JavaScript into your theme and apply the desired changes.
Automatically Adding JavaScript Code with Script Tags
An alternative method to manually adding JavaScript code to your theme is to use script tags. Shopify provides an API that allows you to programmatically add script tags to your store. This means that you can dynamically add JavaScript code to your theme without modifying the liquid template files. By sending a POST request to the script tags endpoint, you can create a new script tag and specify the source and event for the code to execute. This provides a flexible and automated way to add JavaScript functionality to your theme.
FAQs
Q: Can I customize the front end of my store without coding knowledge?
A: While having coding knowledge can be advantageous, there are also themes and apps available that offer visual customization options. These tools allow you to customize your store's front end without writing code. However, for more advanced and specific customizations, coding knowledge may be required.
Q: How can I ensure compatibility with different themes?
A: To ensure compatibility with different themes, it is important to thoroughly test your app across various themes. Additionally, providing clear instructions in your app's documentation and support channels will help users integrate your app seamlessly into their chosen themes.
Q: How do I troubleshoot issues with customizations on different themes?
A: When experiencing issues with customizations on different themes, it is best to refer to the theme's documentation or consult the theme's developer support. Additionally, debugging tools and error logging can assist in identifying and resolving issues.